How to Use the Wix Stores App
- Libby Fancher

- Nov 28, 2024
- 6 min read
A Guide for The Libby Link Clients
Wix Stores is a built in Ecommerce application for your Wix Studio website that lets you sell products and process payments directly from your site.
This guide will help you navigate the key settings and most commonly used features of Wix Stores which can be managed directly from your Wix Dashboard.
Table of Contents

How to Edit, Hide, or Delete a Product with Wix Stores
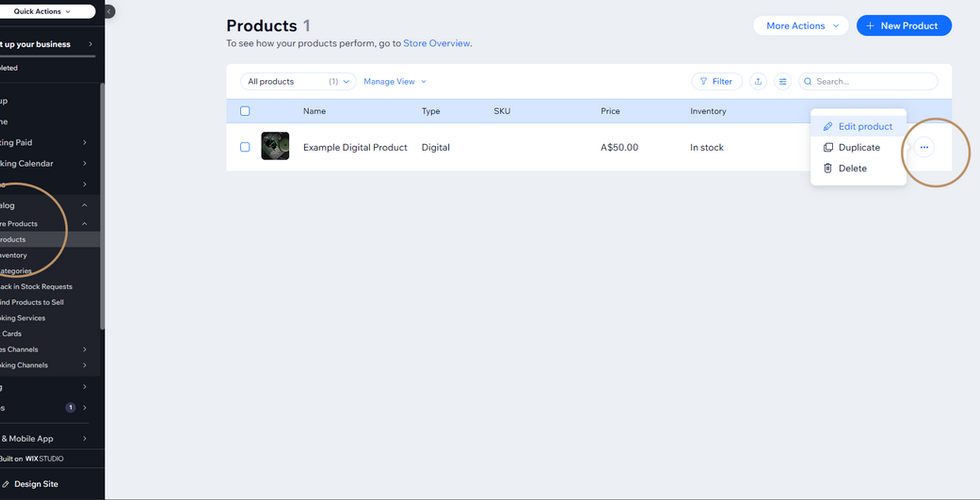
Editing an Existing Product
From the left hand menu on your site Dashboard, select Catalogue then Store Products.
Hover over over the product you want to update and use the 3 dot menu to select Edit Product.

The product listing will open on a new page where you can update the following:
Product Name and Description
The Digital Product File
Product Images and Videos
Product Pricing and Profit Margins
Product Inventory
Product Marketing and SEO

Supported Digital File Formats
File Type | Accepted Formats | Max Size |
Image | jpeg, png, gif | 50 MB |
Audio | WAV, FLAC, M4A (Apple lossless, MP3) | 1 GB |
Zip | .zip | 1 GB |
*Audio files must be stereo, not mono.
Hiding a Product
From the left hand menu on your site Dashboard, select Catalogue then Store Products.
Hover over the product you want to hide and select the Eye icon to hide the product from your site.

Deleting a Product
From the left hand menu on your site Dashboard, select Catalogue then Store Products.
Hover over the product you want to delete and use the 3 dot menu to select Delete to permanently delete the product from your site.

How to Add a New Product
From the left hand menu on your site Dashboard, select Catalogue then Store Products.
Select + Add a New Product from the top right of the page.
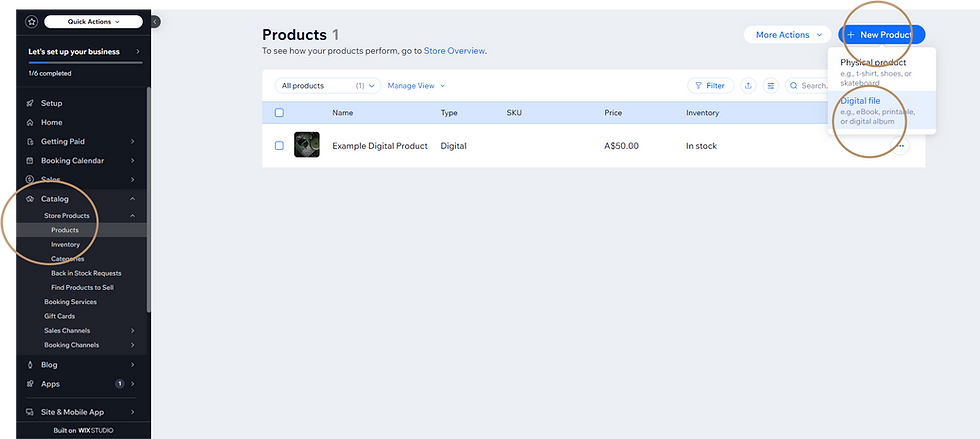
The product listing will open on a new page where you can add the following:
Product Name and Description
The Digital Product File
Product Images and Videos
Product Pricing and Profit Margins
Product Inventory
Product Marketing and SEO
*Your Wix Stores settings have been configured for digital product listings only. To add physical products, please visit the Wix Help Center for guidance on setting up your shipping and delivery settings.
Supported Digital File Formats
File Type | Accepted Formats | Max Size |
Image | jpeg, png, gif | 50 MB |
Audio | WAV, FLAC, M4A (Apple lossless, MP3) | 1 GB |
Zip | .zip | 1 GB |
*Audio files must be stereo, not mono.
How to to Optimise Your Product Pages for SEO
From inside the product listing, select Edit SEO Settings from the Marketing and SEO side bar.
Select the Assistant tab, for a list of tasks to complete to optimise your product listing for search engines and social media.


*Alt text is a short description attached to your image that helps search engines like Google understand the image and lets screen readers read it aloud for visually impaired site visitors. Your alt text should be describe what's in your image, and include natural keywords (skip starting with "image of " or "picture of" just describe what the image shows).
*Meta descriptions are a snippet of text that appears beneath a webpage's title in search engine results pages, helping people understand what they will find when they click on your page.
How to Create Invoices, Payment Links, and Receipts
Collecting Payments with an Invoice or Pay Link
*If you are creating an invoice for the first time, select Invoices, from the left hand menu on your Dashboard, then follow the prompts on screen to set up your invoice template.
From the left hand menu on your Dashboard, select Sales then Orders.

Select the relevant unpaid order from the list, then select Collect Payment from the top right hand corner.

Charge with Invoice will allow you to create an invoice and email it to your client for them to pay online using any of your payment methods.
Charge with Pay Link is a custom URL or QR code that you can share with your client via email, social media, or other channels for them to pay online using any of your payment methods.
Resending a Receipt for a Paid Order
*Automatic email receipts have been enabled for all orders made and paid for on your site.
From the left hand menu on your site Dashboard, select Sales then Orders.
Select the relevant paid order from the list, then select More Actions then Create Receipt from the top right hand corner.

You can then choose to send the receipt to your customer via email, download a PDF copy or print the payment confirmation.
How to Resend a Download Link
*Digital files uploaded to a product listing will be automatically emailed to the customer for all orders made and paid for on your site.
From the left hand menu on your site Dashboard, select Sales then Orders.
Select the relevant paid order from the list, then select the 3 dot menu under Items then Resend Download Link.

How to Apply Sale Prices to Products
Setting a % or $ Discount For a Single Product
From inside the product listing, scroll down to the Pricing section then enable the On Sale toggle, then enter the applicable $ or % discount or sale price.


Setting a % Discount for Multiple Products at Once
From the left hand menu on your site Dashboard, select Catalogue then Store Products.
Bulk select the products you want to apply the sale price to then select More Actions then Set Sale Price.


How to Create Automatic Discounts
From the left hand menu on your site Dashboard, select Catalogue then Automatic Discounts.
Select Create Discount from the top right of the page.
Follow the prompts on screen to create an automatic discount and toggle it on. You can apply automatic discounts as $ or % off, or as a buy X get Y and apply it to:
All products
A product category
Specific products you choose


How to Create a Coupon Code
*Clients with a coupon code must enter their discount code at checkout.
From the left hand menu on your site Dashboard, select Marketing then Coupons.
Select + New Coupon from the top right of the page.

Follow the prompts on screen to create a coupon with the below settings:
The discount amount and type ($ or %)
The coupon code for clients to use on your site
Which product the discount should apply to
The date the discount comes into effect and when it will expire (if applicable)
Whether the discount should be limited to a specific number of uses or limited to one use per customer.
You can promote your coupon using the 3 dot menu next to the relevant discount and selecting Email Campaign or Social Post.


How to Update Automated Email Notifications
Switching Your Email Notifications On or Off
From the left hand menu on your site Dashboard, select Settings then Notification Preferences.
Scroll down to Email to view the email notifications you receive for different interactions with your site and toggle them on or off.

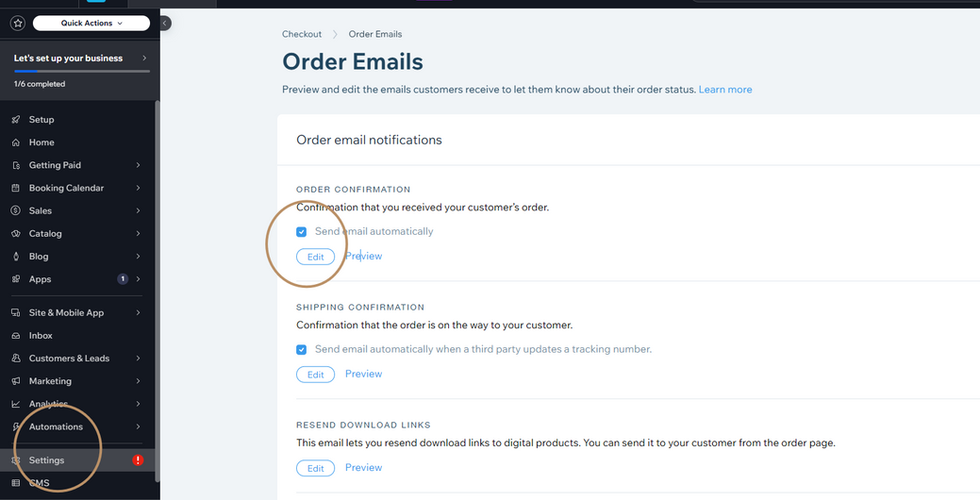
Updating Automated Customer Emails
*The following notifications are configured to automatically send to your customers via email:
Order Confirmation (when an order is placed on your site)
Resend of download link (when you manually resend a download link)
From the left hand menu on your site Dashboard, select Settings then Checkout Settings, then Order Emails.
Hover over the automated email you want to update and select Edit.
Follow the prompts on screen to make changes to your email template.


How to Add or Update Store Checkout Policies
From the left hand menu on your site Dashboard, select Settings then Checkout Settings
Scroll down to Policies to update from the list of policies that will display for your customers at checkout.

How to Refund an Order
From the left hand menu on your site Dashboard, select Payments.
Select the payment you want to refund, then select Refund from the top right of the page.


How to Review Analytics and Reports
From the left hand menu on your site Dashboard, select Analytics, then Store Analytics for an overview of Stores sales, product performance and conversion rates.
For detailed reports of different data relating to your online store and products, select Analytics, then All Reports from the Dashboard.
Need more information on managing your Wix Stores app? Visit the Wix Help Centre.


Comments